Inonoshishi - Shirt Tutorial
Picture Source: From the website www.zerochan.net
Is it possible to make a shirt to hold this fighter's...assests in place? Apparently so. Below you will find a step by step guide to create said shirt to complete your cosplay. Note: you don't have to use the same patterns as I do if you can find something better, but I do recommend it as it will help as you read along.
Tutorial Start!
Supplies
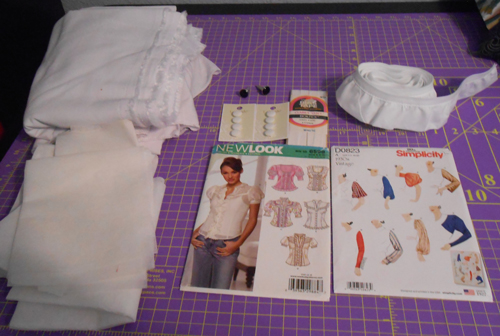
- Suggested patterns: New Look 6599 (Shirt pattern D) + Simplicity 8506 (Sleeve pattern D) Note: Simplicity 8506 can also be listed as D0823 in stores.
- White Fabric - Yardage will depend on your pattern size. Don't calculate for the New Look pattern sleeves as you will get that number from the Simplicity pattern.
- 1 1/4 yards Medium Weight Interfacing
- Seven 1/2" White Buttons
- Four 5/8" White Buttons or a Pair of Cufflinks
- 1 package of White Single Fold Bias Tape
- 2 1/2 yds White Frill Trim (better to be safe than sorry)
- White Thread (duh)
- Scissors
- Pins
- Sewing Machine
Optional Supplies
- Serger Machine - If you don't have one or have access to one, you can just use one of the finishing stitches on your sewing machine to keep the fabric from fraying.
- Fray Check - Recommended if the fabric you chose is notorious for fraying, like most woven appearl fabrics out there.
- Dress Form - If you don't have one, just use yourself.
- White Sew-on Velcro - Because making button holes can be a pain...
- First thing is first: cut out your pattern pieces. Cut out the same size from both patterns (example: size 14).DO NOT cut out the sleeve pieces from the shirt pattern (New Look 6599).
- We are going to make the bodice part first. This part is simple enough as you just have to follow the pattern instructions, skipping the sleeve construction and attaching the frilly trim the original pattern calls for. Note: If you are ever feeling unsure about your progress, pin pieces together and study the form before sewing them together. Try it on if possible as well.
- Adding the details: After sewing the bodice front and yoke pieces together, pin the yoke to the bodice back. Do not sew together yet! We want to position the frilly trim, bias tape, and the little patches on the shirt so we can hide the ends in the hems and keep even. The bias tape is for the strips that lay between the trim and buttons. The "patches" are the rounded squares on the opening of the shirt where the buttons go. (check Source Picture at the top). Best way to check if the details are even after pinning it on is to either drape it on a dress form or on yourself and checking a mirror. If everything looks good, sew on, adventurer!
- Stop just before you have to add buttons and hem the garment. At this point, you will want to put on the shirt again to make sure it still properly fits. You can serge your edges (or use the zig-zag stitch on your machine if your don't have a serger) to stop the potential fraying.
- The next step is to make the sleeves. Just like the bodice, follow the instructions until you get to the finishing touches (adding the buttons or cuff links). We don't want to finish off the cuffs until we are sure everything fits together.
- Test fit the sleeve to the bodice. Only pin the pieces together for now. Since the shoulder is gathered at the top, don't feel bad if you have to bunch it up a little. Try on the shirt and slowly move your arms around to ensure it's comfortable (careful of the pins). Adjust if needed. Sew the pieces together. Check to make sure you caught all of the fabric.
- BREAK TIME! Take a moment to stretch, get a snack, and enjoy this picture of my corgi, Ein.
- Back to work! Almost done. You can start adding the finishing touches to the shirt. Pin the trim base to the wrong side (inside) of the collar, with the frills pointing up (away from the shirt). Sew together. If you used a stiff enough trim, it should stand up on its own. If not, you can try a fabric stiffener (check Joann's or any other fabric store) or use the Rose/Ribbon accessory Ino wears around her neck.
- Continue following the instructions for finishing the sleeves. The sleeves don't require any special alterations outside of the pattern's instructions, so you will be okay with just the pattern.
- Once the sleeves are done, you can finish up the rest of the shirt. You'll find yourself skipping a bunch of steps since the shirt doesn't have the lacing on the back or all of the extra frills everywhere. That's fine. As long as the shirt is beginning to look like Ino's and it fits properly, you are on the right track.
- Buttons: Here's where you can cheat or follow the rules. I find buttonholes a little bit tricky. Sometimes I follow through and do the buttons according to the pattern. Or...I cheat and use Velcro. I measure out both sides of the Velcro against the shirt's front opening for my length. Sew on the Velcro first, making sure they are even with each other. Then, turn on your favorite show and sew the buttons on the front of the shirt. This way is helpful if you have trouble with buttonholes as well.
- Last step! Try on the shirt to ensure it closes all of the way. Turn your body side to side, circle your arms, just move your upper body enough to make sure the shirt is not too tight or too loose. Congrats! You have just finished one of the many pieces in becoming Inonoshishi.
Happy Sewing, fellow cosplayer!